

When you’ve diligently worked on your design in Adobe Illustrator, you realize the canvas feels a little overstuffed. You’ve probably wondered how you can give your digital masterpiece a little more room to breathe. When you use Adobe Illustrator, how can you expand your canvas size so that you can easily create larger images?
In short, a canvas can be reorganized in Adobe Illustrator to create a more flexible project for designers. When you size the canvas, you can create a print masterpiece or a web design that will be both stunning and functional. The purpose of this article is to provide you with a simple, step-by-step procedure for increasing your canvas size, ensuring that your design meets your specifications.
By examining the intricacies of canvas manipulation, we’ll learn techniques, tools, and expert tips to ensure a seamless and efficient process. Discover how you can customize your canvas to create an entire canvas that is as vibrant as you are. Please join us on this journey with Adobe Illustrator, and we’ll all be able to explore its full potential.
Understanding Canvas in Adobe Illustrator
In the realm of Adobe Illustrator mastery, delving into the intricacies of understanding the canvas serves as the foundational cornerstone for any designer seeking to wield their creativity with finesse. The canvas, within the context of Adobe Illustrator, is not merely a blank space awaiting the strokes of a digital brush; it is the very fabric that encapsulates the visual narrative being woven. To comprehend the canvas is to grasp the essence of design fluency, and in this exploration, we navigate the nuances encapsulated in its definition and purpose.
Defining the Canvas
At its core, the canvas in Adobe Illustrator is the virtual space where designers breathe life into their visions. It transcends the physical constraints of traditional mediums, providing a limitless expanse for creative expression. It is more than a mere background; it is the stage upon which every element of a design performs its role. Understanding the canvas begins with acknowledging its role as the blank slate, the birthplace of digital artistry.Purpose and Significance
The canvas in Adobe Illustrator serves a dual purpose – it acts as both the foundation and the frame for your creative endeavors. Its significance lies in its adaptability, offering designers the ability to tailor it to the unique demands of each project. As the virtual workspace, it accommodates the evolution of design, growing or shrinking in tandem with the creative vision. In a world where pixels define precision, resizing the canvas becomes a strategic maneuver in the designer’s toolkit.Adaptability for Various Design Projects
The canvas’s true prowess emerges in its ability to seamlessly accommodate the diverse needs of design projects. From the pixel-perfect precision required for web design to the expansive dimensions demanded by print projects, resizing the canvas is the key to unlocking adaptability. Designers can effortlessly tailor the canvas to fit the nuances of their chosen medium, ensuring that every stroke, shape, and color finds its place harmoniously.The Canvas as a Dynamic Playground
Picture the canvas as a dynamic playground, a digital arena where creativity knows no bounds. Resizing the canvas transcends the conventional, providing a dynamic space that evolves with the designer’s imagination. It’s not just about adjusting dimensions; it’s about expanding the playground, allowing for the experimentation, exploration, and innovation that define cutting-edge design.In essence, understanding the canvas in Adobe Illustrator goes beyond the technicalities; it is about embracing the canvas as a dynamic partner in the creative process. From defining its role to recognizing its adaptability, designers who master the nuances of the canvas unlock a realm of possibilities. As the digital brush meets the canvas, the true artistry lies in comprehending and harnessing the potential encapsulated within the pixels of Adobe Illustrator. Resizing the canvas becomes a strategic dance, a choreography of design elements finding their rhythm within the vast expanse of the digital canvas. It’s not just design; it’s a symphony of pixels orchestrated on the canvas stage.
Navigating Adobe Illustrator Interface
Navigating the Adobe Illustrator interface is akin to mastering the helm of a digital ship, where precision and intuition merge seamlessly. In this digital expanse, locating the canvas size settings and understanding the tools for canvas manipulation is the compass guiding designers through the vast sea of creative possibilities.Locating the Canvas Size Settings
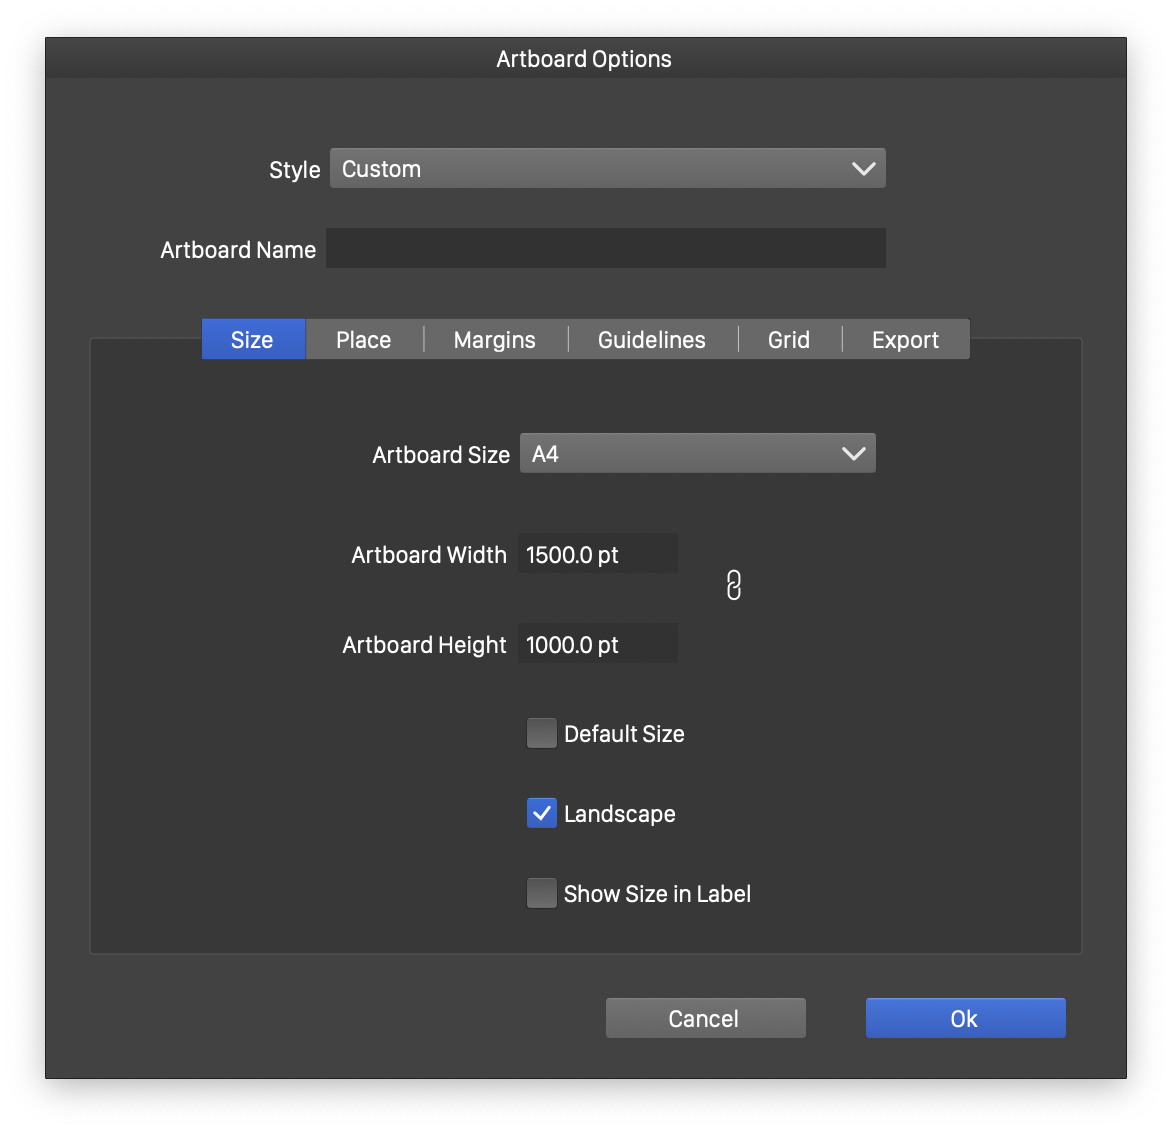
Efficiency in Adobe Illustrator begins with a deft hand at locating the canvas size settings, a skill that transforms the digital workspace. Here’s how to navigate this vital aspect of the interface with finesse: – **Navigation Path:** Find the canvas size settings by navigating to the ‘File’ menu, followed by ‘Document Setup,’ and finally, ‘Edit Artboards.’ – **Artboard Options:** Explore the ‘Artboard’ options to unveil a plethora of settings, including dimensions, orientation, and arrangement.Understanding the Tools for Canvas Manipulation
The Adobe Illustrator interface boasts an arsenal of tools tailored for canvas manipulation, elevating design from mere creation to a strategic choreography of elements. Unveil the power behind the pixels with these insights: – **Artboard Tool Mastery:** The ‘Artboard’ tool is your gateway to canvas manipulation. Click and drag to resize or reposition effortlessly. – **Transform Panel Tactics:** Dive into the ‘Transform’ panel for precision control over dimensions, rotation, and alignment. – **Align and Distribute Palette:** Harness the ‘Align’ and ‘Distribute’ palette to ensure every element aligns harmoniously within the resized canvas.Effortless Interface Navigation
Seamless navigation within the Adobe Illustrator interface is not just about finding settings; it’s about intuitively understanding the tools at your disposal. From the canvas size settings tucked within the ‘File’ menu to the prowess of the ‘Artboard’ tool, the interface becomes a playground for design ingenuity.Strategic Canvas Manipulation
Canvas manipulation transcends the rudimentary; it’s a strategic dance where designers orchestrate the elements within the digital realm. The ‘Transform’ panel and ‘Align and Distribute’ palette emerge as unsung heroes, ensuring precision and alignment that define professional-grade designs.In the realm of Adobe Illustrator, navigation is empowerment, and mastering the canvas size settings and tools for manipulation is the key to unlocking a world of creative supremacy. This is not just software proficiency; it’s a language spoken by design virtuosos navigating the intricate waters of digital artistry. So, set sail into the interface, where every click, drag, and adjustment propels your design voyage to new horizons.
Step-by-Step Guide to Increase Canvas Size
Embarking on the journey of expanding your canvas size in Adobe Illustrator is akin to unlocking a secret pathway to design liberation. This step-by-step guide demystifies the process, ensuring that even novice designers can navigate the intricacies with confidence and finesse.Opening the Existing Project in Adobe Illustrator
The first step in this odyssey involves bringing your existing project into the Adobe Illustrator realm. Here’s your roadmap to a seamless initiation: – **File Menu Navigation:** Access the ‘File’ menu in the top toolbar. – **Select ‘Open’:** Choose the ‘Open’ option to delve into your existing project files. – **Locate and Open:** Navigate to your project file, click ‘Open,’ and watch as your digital canvas comes to life within Adobe Illustrator.Accessing the ‘Artboard’ Tool
With your project loaded, the next waypoint is the ‘Artboard’ tool—a potent instrument for canvas manipulation. Navigate this tool with the precision of a virtuoso: – **Sidebar Exploration:** Spot the ‘Artboard’ tool icon nestled in the sidebar. – **Click and Activate:** A single click activates the ‘Artboard’ tool, transforming your cursor into a digital maestro’s wand. – **Canvas Illumination:** As you hover over the canvas, witness the illumination of existing artboards.Inputting Specific Dimensions or Choosing a Preset
Now comes the crux of the operation—resizing your canvas with precision tailored to your project’s needs. This phase involves a deliberate dance of dimensions and presets: – **Dimension Input:** With the ‘Artboard’ tool active, locate the dimensions input in the top toolbar. – **Manual Precision:** Enter specific dimensions, ensuring pixel-perfect precision for your canvas. – **Preset Selection:** Alternatively, opt for a preset size from the dropdown menu, streamlining the resizing process with predefined dimensions.Adjusting Anchor Points and Alignment
The final strokes of this symphony involve fine-tuning your canvas, ensuring that every element aligns harmoniously within the expanded space: – **Anchor Point Manipulation:** Activate the ‘Direct Selection’ tool to tweak anchor points, preserving the integrity of your design. – **Alignment Mastery:** Utilize the ‘Align’ palette to achieve pixel-perfect alignment, guaranteeing a visually cohesive composition. – **Preview Mode:** Toggle into ‘Preview Mode’ to witness the transformative impact of your canvas adjustments in real-time.In this meticulous ballet of Adobe Illustrator commands, opening, accessing, inputting, and adjusting converge to elevate your design endeavors. With these steps etched into your designer’s repertoire, the canvas is no longer a static entity but a dynamic space molded to the contours of your creative vision. So, armed with the prowess of this step-by-step guide, plunge into the digital canvas with the confidence of a design virtuoso, and let the pixels of possibility unfold before you.
Considerations for Artwork Elements
As designers embark on the transformative journey of adjusting canvas size in Adobe Illustrator, the intricate dance with artwork elements takes center stage. The canvas is not merely a backdrop; it is the stage upon which every element performs, and considerations for these elements are paramount to achieving design harmony.Ensuring All Elements Are Within the New Canvas Boundaries
Ensuring that every design element gracefully fits within the newly expanded canvas boundaries is akin to orchestrating a symphony where each instrument finds its rightful place. Here’s a meticulous guide to this essential consideration: – **Artboard Boundary Check:** Start by visually inspecting the new canvas boundaries to understand the spatial constraints. – **Grouping Elements:** Consider grouping related elements, ensuring they move and resize cohesively within the adjusted canvas. – **Smart Guides Utilization:** Leverage the power of ‘Smart Guides’ to snap elements precisely to the canvas edges, guaranteeing a seamless fit. – **Preview Iteratively:** Enter ‘Preview Mode’ intermittently to evaluate the spatial relationship of elements, making adjustments as needed.Resizing or Repositioning Existing Elements
The ballet of resizing and repositioning existing elements within the canvas is an art form that requires finesse and precision. Navigate this delicate process with the expertise of a seasoned designer: – **Selection Precision:** Activate the ‘Selection’ tool to meticulously choose the elements slated for adjustment. – **Transform Panel Mastery:** Employ the ‘Transform’ panel to precisely input new dimensions or reposition elements numerically, ensuring accuracy. – **Freeform Adjustment:** Embrace the ‘Free Transform’ tool for a more organic, freeform adjustment, allowing creative flexibility. – **Align and Distribute Palette:** The ‘Align and Distribute’ palette emerges as a trusted ally, providing options to align elements to the artboard or distribute them evenly.Harmonizing Elements for Aesthetic Cohesion
Considerations for artwork elements extend beyond technicalities; they epitomize the pursuit of aesthetic cohesion. In the realm of design, every pixel matters, and resizing or repositioning elements is not merely an adjustment but a meticulous curation of visual harmony. As the canvas expands, the challenge is not just to fit elements within the boundaries but to craft a composition that resonates with design finesse.Dynamic Design Evolution
The considerations for artwork elements signify more than a technical checklist; they embody the dynamic evolution of a design. As elements seamlessly adapt to the new canvas dimensions, the design narrative unfolds, telling a story of creativity unbounded. It’s not just about fitting; it’s about ensuring each element contributes harmoniously to the visual narrative.In the intricate dance of design, considerations for artwork elements emerge as the choreography of pixels, where precision meets creativity. As designers navigate the canvas, reshaping and redefining its boundaries, the symphony of elements within becomes the hallmark of design mastery. So, let every adjustment be a brushstroke on the canvas of possibility, where the elements not only fit but dance in unison to the rhythm of design brilliance.
Expanding Canvas for Specific Design Requirements

Customizing Canvas Size for Print Projects
Customization is the heartbeat of print design, where pixel precision translates into tangible, high-resolution output. Consider these meticulous steps when expanding the canvas for print projects: – **DPI Configuration:** Begin by configuring the canvas with the desired Dots Per Inch (DPI) setting, commonly 300 DPI for print. – **Dimensions Precision:** Input specific dimensions, adhering to the physical constraints of the intended print medium, whether it be a poster, flyer, or business card. – **Bleed Inclusion:** Factor in bleed by extending the canvas slightly beyond the trim area, ensuring no white borders post-printing. – **Color Mode Adjustment:** Shift the color mode to CMYK for accurate representation of print colors, departing from the RGB used for digital displays.Adapting Canvas Dimensions for Web Design
Web design, on the other hand, dances to the rhythm of responsive layouts and pixel-perfect alignment. When expanding the canvas for web design, consider these strategic maneuvers: – **Resolution for Screens:** Opt for a screen-friendly resolution, typically 72 DPI, acknowledging the difference in display requirements compared to print. – **Responsive Canvas:** Embrace the fluidity of web design by creating a canvas that adapts to various screen sizes. Utilize percentages or specific dimensions based on breakpoints for responsive layouts. – **RGB Dominance:** Stick to the RGB color mode to ensure vibrancy and consistency across digital devices. – **Artboard Multiplicity:** In web design, contemplate the necessity for multiple artboards, representing various screen sizes, ensuring a comprehensive understanding of the user experience.The Precision Dance of Pixels
Customizing the canvas size for print or web design is more than a technical adjustment; it’s a precision dance of pixels that aligns with the inherent nature of each medium. In print, where the end result is tangible, the canvas becomes a meticulous blueprint, accommodating bleed, high resolution, and color accuracy. In web design, where the canvas is fluid and dynamic, it transforms into a responsive stage, catering to the myriad of screens that may showcase the digital masterpiece.Designing for the Medium, Beyond the Canvas
Expanding the canvas for specific design requirements extends beyond pixel dimensions; it delves into understanding the very nature of the medium. It’s not just about resizing; it’s about designing for the nuances of print or the dynamic interactivity of the web. As designers navigate the complexities of canvas expansion, they architect visual narratives that seamlessly integrate with the essence of the chosen medium.In the grand tapestry of design, where pixels meet print or pixels meet screens, the canvas is the conduit of creativity. So, whether it’s the meticulous precision of print or the adaptive fluidity of the web, let the canvas be your accomplice in crafting designs that transcend the digital realm and materialize into impactful experiences.
Utilizing Artboard Options
Exploring Additional Options within the ‘Artboard’ Menu
The ‘Artboard’ menu, often an unsung hero in the Illustrator saga, holds a treasure trove of additional options beyond the conventional canvas adjustments. Here’s a roadmap to navigate this digital labyrinth: – **Artboard Tool Revelation:** Activate the ‘Artboard’ tool from the toolbar, transforming your cursor into a magic wand ready to weave design wonders. – **Rulers and Guides:** Dive into the ‘View’ menu within ‘Artboard’ to toggle rulers and guides, providing a visual scaffold for precision. – **Artboard Reordering:** Experiment with rearranging artboards by selecting and dragging, unleashing the power to redefine the visual hierarchy of your project. – **Artboard Duplication:** Duplicate artboards effortlessly, a strategic move for iteration and variation within a design.Creating Multiple Artboards for Complex Projects
The realm of complex projects demands more than a singular canvas; it craves a tapestry of interconnected artboards that seamlessly integrate into a cohesive masterpiece. Here’s a strategic guide to creating multiple artboards: – **Project Scope Evaluation:** Assess the scope of your project, identifying distinct sections or variations that warrant individual attention. – **Artboard Addition:** Add artboards with precision using the ‘Artboard’ tool, considering the desired dimensions for each segment of your design. – **Organized Canvas Structure:** Arrange artboards in a logical sequence, mirroring the flow of your project, creating an organized canvas structure. – **Iteration and Experimentation:** Leverage multiple artboards for iterative design, enabling experimentation without compromising the integrity of the original concept.The Art of Visual Storytelling
Utilizing artboard options transcends the technical; it’s the art of visual storytelling within the digital realm. Each artboard becomes a chapter, contributing to the narrative of your design journey. Whether it’s exploring alternate compositions, refining details, or presenting variations, the multiple artboards unfold a visual narrative that speaks volumes.Strategic Efficiency in Design Iterations
In the fast-paced world of design, efficiency is the currency that defines success. Multiple artboards become the strategic engine, facilitating design iterations without the need to backtrack or compromise the initial vision. It’s not just about creating; it’s about refining, evolving, and perfecting within the seamless continuity of artboards.In the symphony of Adobe Illustrator, the utilization of artboard options is the virtuoso performance, where every click and adjustment contributes to the opus of design brilliance. So, let the ‘Artboard’ menu be your ally, and the creation of multiple artboards your signature move, as you navigate the intricate dance of pixels, bringing your design symphony to life.
Troubleshooting and Tips
Common Issues While Resizing Canvas
Resizing the canvas might seem straightforward, but lurking beneath the surface are challenges that can impede the design flow. Identifying and troubleshooting these common issues is paramount for a designer’s success: – **Content Distortion:** Enlarging the canvas without proportionately adjusting content can lead to pixelation and distortion, compromising the visual integrity. – **Anchor Point Misalignment:** Incorrectly adjusting anchor points during the resizing process can result in skewed or misaligned elements within the design. – **Resolution Mismatch:** Neglecting to match the resolution settings of the original canvas when expanding can lead to a loss of image quality and detail. – **Artboard Boundary Confusion:** Overlapping artboards or misjudging the canvas boundaries may cause confusion, impacting the overall layout.Tips for a Smooth and Error-Free Process
While challenges may arise, armed with a repertoire of tips, designers can steer through the resizing process with finesse, ensuring a smooth and error-free journey: – **Group Elements:** Before resizing, group related elements to maintain their spatial relationships and prevent unintended distortions. – **Backup Original File:** Duplicate the project file before resizing, creating a safeguard against irreversible changes and facilitating easy rollback if needed. – **Smart Guides Activation:** Turn on ‘Smart Guides’ to enable on-screen cues for precise alignment, preventing misplacement of elements. – **Regular Preview Checks:** Frequently toggle into ‘Preview Mode’ to assess the design’s appearance in real-time, identifying and rectifying issues promptly. – **Utilize Undo Function:** Embrace the power of ‘Undo’ (Ctrl+Z) liberally, especially after each significant adjustment, offering an immediate retreat from undesired changes.Strategic Data-Driven Decision-Making
In the realm of troubleshooting and tips, strategic decision-making based on data is the linchpin of success. For instance, understanding the average canvas size preferences in your design niche can inform your resizing choices. According to industry insights, the optimal canvas size for web graphics hovers around 1200×628 pixels for social media posts, while print projects may demand larger dimensions, such as the standard 8.5×11 inches for flyers.Design Agility in the Face of Challenges
Troubleshooting and tips are not mere roadblocks; they are opportunities for design agility. Each challenge presents a chance for creative problem-solving and mastery of the Adobe Illustrator toolkit. As designers navigate the complexities of canvas resizing, embracing a mindset of continuous learning and adaptation becomes the hallmark of design prowess.In the grand tapestry of design, troubleshooting is not a setback but a stepping stone toward perfection. Tips, gleaned from experience and industry insights, become the compass guiding designers through the labyrinth of canvas resizing. So, armed with the knowledge of common pitfalls and expert strategies, designers can confidently resize their canvases, transforming challenges into triumphs within the digital atelier.
Saving and Exporting
Navigating the labyrinth of design in Adobe Illustrator is a symphony of creativity, precision, and, ultimately, preservation. As designers sculpt their digital masterpieces, the crucial chapters of this artistic journey unfold in the acts of saving changes to the existing project file and exporting the design with the new canvas size. These actions are not mere technicalities but pivotal moments where the digital becomes tangible, and the design journey transitions from the studio to the world.Saving Changes to the Existing Project File
Saving changes is not a perfunctory task but a strategic maneuver to preserve the evolving narrative of a design. In the realm of Adobe Illustrator, this involves a nuanced dance with pixels and vectors, ensuring that every stroke and curve is etched into the annals of the project file. Consider these essential steps: – **File Format Selection:** Choose the appropriate file format based on the project’s nature. Illustrator’s native AI format retains layers and editability, while formats like PDF, SVG, or EPS ensure compatibility with other platforms. – **Incremental Versioning:** Embrace the wisdom of incremental versioning. Save iterations as separate files, providing a safety net in case a creative tangent leads to uncharted territories. – **Layer Organization:** Maintain a disciplined approach to layer organization. Group elements logically, enabling a seamless workflow and facilitating future edits.Exporting the Design with the New Canvas Size
Exporting is the bridge that connects the secluded design realm with the wider audience. It transforms the intricate layers and pixels into a consumable format, ready for display and dissemination. Here’s a strategic guide to exporting designs with the new canvas size: – **Canvas Dimension Precision:** Ensure that the exported canvas aligns precisely with the intended dimensions. Precision is the hallmark of a design that transcends digital boundaries. – **File Type Consideration:** Choose the appropriate file type for the intended use. For web graphics, PNG or JPEG might be suitable, while print projects may demand high-resolution PDF or TIFF files. – **Resolution Calibration:** Calibrate the resolution settings during export. For digital platforms, a standard 72 DPI may suffice, but print materials necessitate higher resolutions for optimal quality. – **Color Mode Alignment:** Confirm that the exported design adheres to the desired color mode, whether it’s RGB for digital displays or CMYK for print accuracy.The Tapestry of Design Legacy
Saving and exporting, seemingly routine actions, are the threads that weave the tapestry of a design legacy. Each click of the save button and each export command immortalize the hours of creativity, ideation, and meticulous craftsmanship. It’s not just about preserving pixels; it’s about encapsulating the essence of a designer’s vision.Beyond the Studio Walls
As designers execute the finale of their artistic saga by saving and exporting, they extend their creations beyond the studio walls. The exported file becomes a vessel, carrying the visual narrative to viewers, clients, and collaborators. It is a manifestation of artistic intent, ready to be showcased on digital platforms, in print publications, or as part of multimedia presentations.In the symphony of Adobe Illustrator, saving changes and exporting designs are the crescendo moments, where the digital symphony transforms into a tangible masterpiece. It’s a testament to the meticulousness of the design process, where every stroke and adjustment is a brushstroke on the canvas of digital artistry. So, as designers click ‘Save’ and initiate the export, they not only conclude a project but usher their creations into the limelight, ready to captivate the world with their visual brilliance.