

Learn how to create stunning brackets in Adobe Illustrator so you don’t have to struggle anymore!
You will learn everything you need to know about creating brackets in Adobe Illustrator, from the fundamentals to advanced techniques, thanks to this article. You can choose from a wide range of design disciplines, whether you are a first-time designer or an experienced one.
Are you ready to take your bracket game to the next level and unleash your creativity like never before? This course will show you how to create brackets in Adobe Illustrator and get your creativity running wild.
Understanding Bracket Basics
When delving into the realm of design, understanding the fundamental concept of brackets is akin to grasping the foundational principles of architectural structure; they provide support, delineate boundaries, and contribute to the overall visual composition. In design parlance, brackets serve as ornamental or functional elements that frame content, create emphasis, or add decorative flair. From the humble parentheses enclosing a text snippet to the intricate flourishes adorning a vintage poster, brackets wield significant influence in guiding the viewer’s gaze and conveying nuanced meaning.
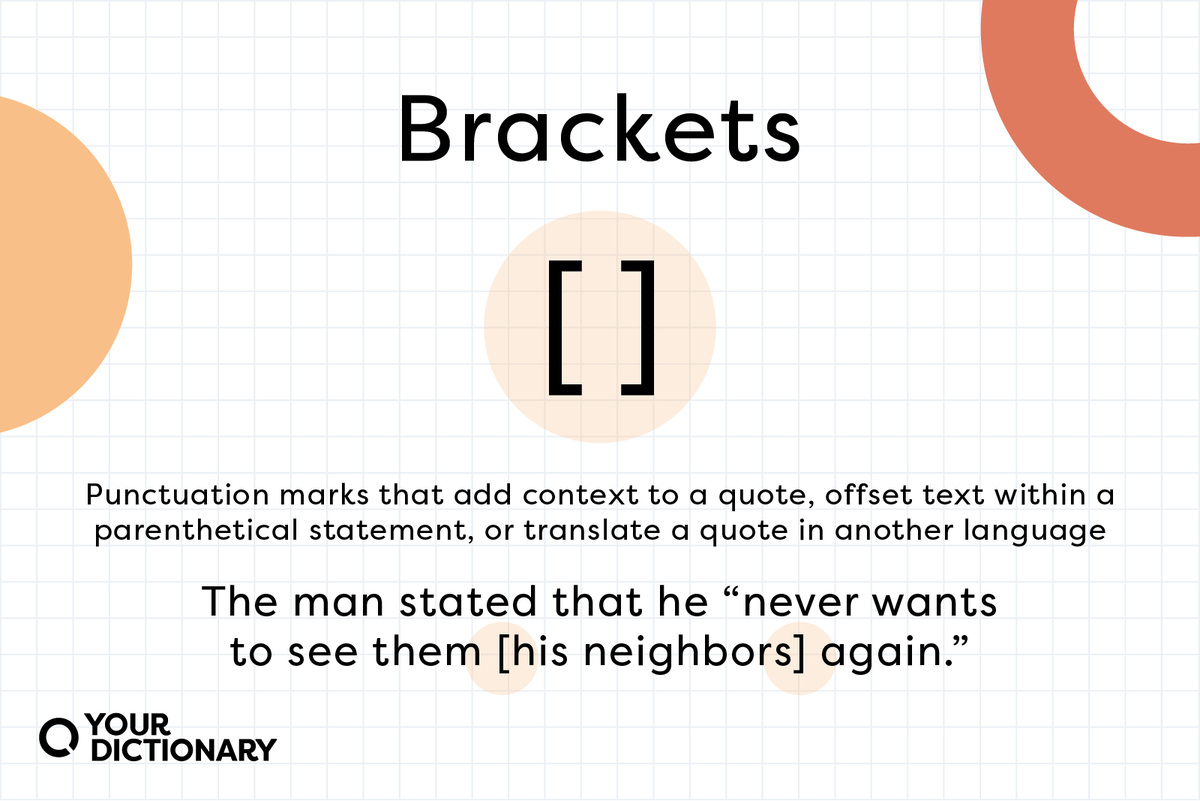
A. What is a bracket in design? – At its core, a bracket in design encapsulates a diverse array of shapes, symbols, and typographic elements used to enclose, embellish, or structure visual content. From the conventional square brackets denoting quotations to the elaborate curly braces employed in coding languages, the concept of brackets transcends disciplinary boundaries, manifesting in various forms across graphic design, typography, architecture, and beyond. In graphic design, brackets encompass a broad spectrum of symbols, ranging from simple geometric shapes to elaborate decorative motifs, each imbued with its own aesthetic and functional significance.
B. Importance of brackets in graphic design. – Brackets play a pivotal role in graphic design by serving as versatile tools for organizing information, enhancing readability, and imbuing compositions with visual interest. Whether employed as framing devices to enclose text or as decorative embellishments to adorn illustrations, brackets exert a subtle yet impactful influence on the overall aesthetic and communicative efficacy of a design. Beyond their utilitarian function, brackets possess inherent symbolic connotations, evoking associations with structure, containment, and hierarchy, thereby imbuing designs with a sense of order, coherence, and visual hierarchy.
C. Different types of brackets used in design. – The taxonomy of brackets in design encompasses a diverse array of forms, each characterized by its distinctive shape, function, and stylistic attributes. Common types of brackets include: 1. Parentheses: These curved brackets, resembling a pair of commas facing each other, are commonly used to enclose supplementary information, citations, or asides within a text. 2. Square Brackets: Represented by a pair of straight, perpendicular lines, square brackets are employed to denote editorial insertions, corrections, or clarifications within quoted text. 3. Curly Braces: Also known as braces or squiggly brackets, curly braces consist of two inward-curving lines connected at the top, typically used in mathematical notation, coding languages, or as decorative elements in design. 4. Angle Brackets: These triangular-shaped brackets, resembling the symbols ‘<‘ and ‘>’, find widespread use in coding languages, markup languages, and typography to denote tags, directives, or enclosing elements.
In essence, comprehending the nuances of bracket usage in design empowers designers to wield these versatile elements with precision and creativity, harnessing their potential to structure information, convey meaning, and elevate the visual impact of their creations. Whether employed as functional delimiters, decorative flourishes, or symbolic signifiers, brackets exemplify the symbiotic relationship between form and function in the realm of graphic design, transcending their humble typographic origins to become indispensable tools in the designer’s arsenal.
Getting Started with Adobe Illustrator

Embarking on a journey with Adobe Illustrator is akin to stepping into an artist’s atelier, where creativity knows no bounds and the canvas of possibilities stretches infinitely before you. Let’s delve into the essential primer for navigating this digital realm with finesse and flair, from acquainting yourself with the software’s interface to mastering the art of document setup.
A. Introduction to Adobe Illustrator. – Adobe Illustrator stands as the paragon of vector graphics software, revered by artists, designers, and illustrators alike for its unparalleled precision, versatility, and creative potential. As the cornerstone of graphic design, Illustrator empowers users to bring their wildest imaginations to life, whether crafting intricate illustrations, designing captivating logos, or conceptualizing visually stunning layouts. With a rich repertoire of tools and features at your disposal, Illustrator serves as the ultimate playground for unleashing your artistic vision and transforming ideas into tangible masterpieces.
B. Setting up a new document. – Before diving headlong into the creative process, mastering the art of document setup lays the foundation for seamless design workflow and optimal output. Begin by selecting the appropriate document type, whether it be a print project, web design, or illustration. Next, define essential parameters such as dimensions, orientation, and resolution, ensuring your canvas aligns with the intended medium and specifications. Don’t forget to customize advanced settings such as color mode and artboard arrangement to suit your project’s requirements. By meticulously configuring these initial settings, you pave the way for a smooth and efficient design journey, free from the constraints of technical hiccups or compatibility issues.
C. Familiarizing with the Illustrator workspace. – As you step into the hallowed domain of the Illustrator workspace, acquainting yourself with its myriad panels, tools, and palettes is paramount to navigating this digital terrain with ease and proficiency. From the toolbar brimming with an arsenal of drawing implements to the expansive artboard serving as your creative canvas, each element of the workspace plays a pivotal role in shaping your design experience. Take the time to explore and familiarize yourself with essential panels such as Layers, Properties, and Libraries, each offering invaluable resources and functionalities to streamline your workflow. Embrace the dynamic interplay between precision and creativity as you navigate the labyrinthine depths of the Illustrator workspace, forging a symbiotic relationship between artist and tool.
In essence, embarking on your journey with Adobe Illustrator entails more than mere technical proficiency; it embodies a voyage of discovery, innovation, and boundless creativity. By delving into the nuances of document setup, interface navigation, and tool mastery, you unlock the gateway to a realm where imagination knows no bounds and artistic expression flourishes unabated. So, seize your digital brush, venture forth into the vast expanse of Illustrator’s domain, and let the symphony of creativity unfold upon your digital canvas.
Creating Simple Bracket Shapes
Embarking on the journey of creating simple bracket shapes in Adobe Illustrator is akin to wielding a digital brush with finesse and precision, transforming mundane lines into elegant curves that dance across the canvas with grace and fluidity. Let’s explore the essential techniques and tools at your disposal for crafting these versatile design elements with effortless ease and artistic flair.
A. Using the Pen Tool to draw basic bracket shapes. – The Pen Tool stands as the stalwart companion of every illustrator, offering unparalleled control and flexibility in shaping intricate curves and contours. Begin by selecting the Pen Tool from the toolbar and plotting anchor points along the desired path, adjusting the direction handles to refine the curvature of your bracket shape. With each deft stroke of the Pen Tool, you breathe life into your design, seamlessly sculpting elegant brackets that exude sophistication and charm.
B. Utilizing the Shape Tools for quick bracket creation. – For those seeking a more expedient route to bracket creation, the Shape Tools present an invaluable shortcut to crafting simple yet stylish bracket shapes with minimal effort. Whether it be the Rectangle Tool, Ellipse Tool, or Polygon Tool, each Shape Tool offers a distinct approach to generating bracket elements, from crisp rectangular brackets to whimsical rounded variants. Simply select the desired Shape Tool from the toolbar, drag out the shape on the canvas, and adjust its dimensions to achieve the desired bracket proportions. With the Shape Tools at your disposal, you can effortlessly whip up an array of bracket shapes in a fraction of the time, freeing your creative energy to focus on refining the finer details of your design.
C. Adjusting stroke and fill settings for brackets. – As the finishing touch to your bracket creations, mastering the art of stroke and fill settings adds depth, dimension, and visual impact to your design compositions. Experiment with different stroke weights and styles to impart a sense of weight and definition to your bracket outlines, from delicate hairline strokes to bold, assertive lines that command attention. Similarly, explore a spectrum of fill colors and gradients to infuse your brackets with vibrancy, contrast, and personality, elevating them from mere design elements to dynamic focal points that captivate the viewer’s gaze. By judiciously manipulating stroke and fill settings, you imbue your bracket shapes with a sense of character and style, transforming them from mere adornments into integral components of your visual narrative.
In essence, the art of creating simple bracket shapes in Adobe Illustrator transcends mere technical proficiency; it embodies a symphony of creativity, craftsmanship, and ingenuity. Whether wielding the Pen Tool with surgical precision or harnessing the intuitive power of Shape Tools, each stroke and curve serves as a testament to your artistic vision and mastery of the digital medium. So, embrace the boundless possibilities that await within the realm of bracket design, and let your creativity soar to new heights as you sculpt elegant shapes that leave a lasting impression on beholders far and wide.
Advanced Bracket Design Techniques
Embark on a journey into the realm of advanced bracket design techniques, where creativity knows no bounds and innovation reigns supreme. Explore the intricate art of custom bracket creation, delving deep into the nuances of anchor points, Pathfinder tools, and dynamic gradients to elevate your designs to unprecedented levels of sophistication and visual appeal.
A. Incorporating anchor points for custom bracket shapes. – Anchor points serve as the building blocks of custom bracket design, allowing you to sculpt intricate curves and contours with unparalleled precision and control. Begin by strategically placing anchor points along the desired path of your bracket shape, manipulating their position and curvature to achieve the perfect balance of elegance and symmetry. With each deft adjustment, you breathe life into your design, transforming humble lines into graceful arcs that captivate the eye and command attention. Embrace the power of anchor points as your creative allies, and unlock the limitless potential of custom bracket shapes that defy convention and inspire awe.
B. Exploring the Pathfinder tool for complex bracket designs. – Enter the realm of design alchemy with the Pathfinder tool, a veritable magician’s wand that enables you to meld, merge, and manipulate shapes with unparalleled finesse and dexterity. Harness the transformative power of Pathfinder operations such as Unite, Minus Front, and Intersect to seamlessly merge disparate shapes into cohesive bracket designs, effortlessly blending form and function into a harmonious whole. Whether crafting intricate filigree patterns or bold geometric motifs, the Pathfinder tool empowers you to push the boundaries of creativity and realize your boldest design aspirations with ease and confidence.
C. Adding gradients and effects to enhance bracket appearance. – Elevate your bracket designs from mere vectors to dynamic works of art with the judicious application of gradients and effects that imbue them with depth, dimension, and visual intrigue. Experiment with gradient fills to infuse your brackets with rich, luminous hues that transition seamlessly from light to shadow, adding a sense of realism and vitality to your compositions. Explore a plethora of effects such as drop shadows, glows, and embossing to imbue your brackets with tactile textures and subtle nuances that elevate them from mere adornments to focal points of interest. With each stroke of your digital brush, you breathe life into your designs, transforming them into immersive visual experiences that captivate the senses and inspire wonder.
In essence, mastering advanced bracket design techniques is more than a mere technical feat; it is an artistic odyssey that invites you to push the boundaries of creativity, defy the constraints of convention, and unleash the full potential of your imagination. With each brushstroke and bezier curve, you weave a tapestry of beauty and innovation that transcends the confines of the digital realm, leaving an indelible mark on the canvas of design history. So, embrace the challenge, dare to dream, and embark on a journey of discovery and self-expression that promises to elevate your designs to unparalleled heights of excellence and distinction.
Using Brushes and Symbols for Brackets
Unlock the full potential of bracket design with the transformative power of custom brushes and symbol libraries, breathing life into your creations with a symphony of intricate details and captivating embellishments. From bespoke border designs to ornate decorative elements, harness the creative versatility of brushes and symbols to elevate your bracket compositions to unprecedented levels of sophistication and visual impact.
A. Creating custom brushes for bracket borders. – Delve into the realm of custom brush creation, where every stroke becomes a testament to your artistic vision and ingenuity. Begin by selecting a base shape or pattern that serves as the foundation for your brush design, whether it be a simple line segment or a more elaborate motif. Next, navigate to the Brushes panel and select “New Brush” to initiate the brush creation process. Experiment with brush settings such as size, spacing, and scatter to tailor the brush to your desired aesthetic, ensuring each stroke imparts a unique character and flair to your bracket borders. With custom brushes at your disposal, you wield the power to infuse your designs with a sense of authenticity and craftsmanship that sets them apart from the mundane.
B. Utilizing symbol libraries for decorative bracket elements. – Explore a treasure trove of decorative motifs and ornamental flourishes within Illustrator’s expansive symbol libraries, where inspiration awaits at every turn. From classic filigree patterns to whimsical botanical motifs, the possibilities are as boundless as your imagination. Simply access the Symbols panel and browse through the extensive library of pre-designed symbols, selecting those that resonate with your design aesthetic. Once imported, these symbols can be easily manipulated and resized to fit seamlessly within your bracket compositions, adding a touch of elegance and sophistication that elevates your designs to new heights. With symbol libraries as your creative arsenal, you transcend the constraints of traditional design conventions, forging a path of innovation and originality that leaves a lasting impression on beholders.
C. Applying brushes and symbols to enhance bracket designs. – With custom brushes and symbol libraries at your fingertips, the final step in the bracket design process is to apply these transformative elements with precision and finesse. Whether adorning bracket borders with intricate brush strokes or embellishing compositions with decorative symbols, each addition serves to enhance the visual impact and narrative depth of your designs. Experiment with layering and blending modes to achieve dynamic effects and subtle nuances, imbuing your brackets with a sense of depth, texture, and dimension that captivates the eye and ignites the imagination. By judiciously applying brushes and symbols, you transcend the realm of mere design and enter a realm of artistic expression and storytelling that resonates with audiences far and wide.
In essence, the art of using brushes and symbols for bracket design transcends mere technical proficiency; it embodies a symphony of creativity, craftsmanship, and innovation that transforms humble vectors into immersive works of art. With each stroke and flourish, you weave a tapestry of beauty and complexity that captivates the senses and inspires wonder. So, embrace the power of brushes and symbols, and embark on a journey of creative exploration and self-expression that knows no bounds.
Tips and Tricks for Efficient Bracket Creation
Unleash the full potential of your bracket design prowess with a repertoire of time-saving tips and tricks that streamline your workflow and elevate your creations to new heights of precision and efficiency. From mastering keyboard shortcuts to harnessing the power of alignment tools and layer organization techniques, these invaluable strategies empower you to navigate the intricacies of bracket design with finesse and flair, transforming your creative vision into tangible masterpieces with unparalleled ease.
A. Keyboard shortcuts for faster bracket design. – Embrace the efficiency of keyboard shortcuts as your secret weapon in the arsenal of bracket creation, shaving precious seconds off your workflow and enabling seamless navigation through Illustrator’s vast array of tools and functionalities. From swiftly toggling between selection and drawing modes with a single keystroke to executing complex commands with lightning speed, mastering keyboard shortcuts empowers you to work smarter, not harder, as you bring your bracket designs to life with effortless precision and finesse. Explore a myriad of shortcuts for common tasks such as creating anchor points, adjusting stroke properties, and duplicating elements, and watch as your productivity soars to new heights, leaving inefficiency in the dust.
B. Using alignment tools to ensure precision in bracket placement. – Precision is paramount in the realm of bracket design, where the slightest misalignment can disrupt the harmony of your compositions and compromise the integrity of your vision. Harness the power of alignment tools such as Align and Distribute to effortlessly position and arrange bracket elements with pixel-perfect accuracy, ensuring symmetry, balance, and visual cohesion in every design iteration. Whether aligning brackets to a central axis, distributing them evenly along a path, or spacing them uniformly across a layout, these indispensable tools empower you to achieve flawless results with minimal effort, unleashing the full potential of your creative prowess with precision and finesse.
C. Organizing layers for better management of bracket elements. – Organization is the cornerstone of efficient workflow management, especially in the complex world of bracket design where myriad elements vie for attention on the digital canvas. Take control of your design process by meticulously organizing layers to categorize and compartmentalize bracket elements, facilitating swift navigation, editing, and manipulation of individual components with ease and precision. Whether grouping related elements together, labeling layers for clarity, or nesting objects within hierarchies, these organizational techniques ensure that your design workflow remains fluid and intuitive, empowering you to focus on the creative task at hand without succumbing to the chaos of cluttered compositions.
In essence, the art of efficient bracket creation transcends mere technical proficiency; it embodies a mindset of optimization, innovation, and relentless pursuit of excellence. By embracing time-saving strategies such as keyboard shortcuts, alignment tools, and layer organization techniques, you unlock the full potential of your creative vision, transforming humble brackets into works of art that captivate the eye and inspire wonder. So, arm yourself with these invaluable tips and tricks, and embark on a journey of creative exploration and self-discovery that knows no bounds.
Exporting and Saving Bracket Designs
Mastering the art of exporting and saving bracket designs is paramount in ensuring the longevity, accessibility, and versatility of your creative endeavors. As you traverse the intricate landscape of digital design, familiarize yourself with the essential techniques and best practices for preserving and disseminating your bracket creations with efficiency and precision.
A. Saving Illustrator files for future editing. – Safeguard the fruits of your creative labor by diligently saving Illustrator files in a format that preserves the integrity and fidelity of your bracket designs for future editing and refinement. Opt for the native .ai file format, which retains essential vector data, layer organization, and editing capabilities, allowing you to revisit and revise your brackets with ease and flexibility. Embrace the habit of regular saving and version control to mitigate the risk of data loss or corruption, ensuring that your design journey unfolds smoothly and seamlessly without the specter of irreparable damage looming overhead.
B. Exporting brackets for use in other design projects. – Extend the reach of your bracket designs beyond the confines of Illustrator by exporting them in a variety of file formats tailored to different design projects and platforms. Whether preparing brackets for web graphics, print publications, or multimedia presentations, select the appropriate file format such as PNG, JPEG, or SVG that strikes a balance between image quality, file size, and compatibility. Consider factors such as transparency, resolution, and color space when exporting brackets for specific applications, ensuring optimal visual fidelity and seamless integration into your design workflow with minimal hassle or compromise.
C. Optimizing bracket files for various platforms and purposes. – Navigate the labyrinth of digital optimization with finesse and precision, tailoring your bracket files to meet the diverse requirements and constraints of various platforms and purposes. Embrace optimization techniques such as file compression, image scaling, and color management to minimize file size, enhance loading speed, and maximize compatibility across different devices and environments. Consider the target platform’s specifications and user expectations when optimizing bracket files for web, mobile, or print applications, striking a delicate balance between visual quality and performance to deliver an optimal user experience that leaves a lasting impression on beholders.
In essence, the art of exporting and saving bracket designs transcends mere technical proficiency; it embodies a mindset of foresight, adaptability, and meticulous attention to detail that ensures your creative endeavors stand the test of time and resonate with audiences far and wide. By mastering the nuances of file preservation, export optimization, and platform compatibility, you empower yourself to unleash the full potential of your bracket designs, transforming humble vectors into immersive visual experiences that captivate the senses and inspire wonder. So, embrace these essential techniques and best practices, and embark on a journey of creative exploration and self-expression that knows no bounds.
Inspiration and Resources
Embark on a journey of creative discovery and innovation as we delve into the rich tapestry of inspiration and resources that fuel the vibrant world of bracket design. From showcasing exemplary designs to curating a treasure trove of online resources, and offering invaluable tips for finding inspiration and staying abreast of design trends, this comprehensive guide equips you with the tools and knowledge to unleash your creative potential and craft bracket designs that captivate the imagination and inspire awe.
A. Showcasing examples of creative bracket designs. – Immerse yourself in a visual feast of creativity and ingenuity as we spotlight a curated selection of exemplary bracket designs that push the boundaries of artistic expression and technical prowess. Explore a diverse array of styles, from sleek and minimalist to ornate and whimsical, each design a testament to the boundless creativity and innovation that defines the world of graphic design. Draw inspiration from the intricate details, bold compositions, and imaginative concepts showcased in these designs, and let them serve as a springboard for your own creative endeavors.
B. Online resources for free bracket templates and brushes. – Access a wealth of resources at your fingertips with our curated list of online repositories offering free bracket templates, brushes, and design assets to fuel your creative endeavors. Discover a myriad of options ranging from basic bracket shapes to intricate decorative elements, each meticulously crafted to streamline your workflow and enhance your design process. Whether you’re a seasoned professional or a budding enthusiast, these resources provide a valuable source of inspiration and tools to elevate your bracket designs to new heights of sophistication and visual impact.
C. Tips for finding inspiration and staying updated on design trends. – Navigate the ever-evolving landscape of design trends with confidence and finesse, armed with a repertoire of tips and strategies for finding inspiration and staying ahead of the curve. Cultivate a habit of curiosity and observation, drawing inspiration from diverse sources such as nature, architecture, art, and pop culture to infuse your bracket designs with fresh ideas and perspectives. Stay connected with the design community through online forums, social media groups, and industry events, exchanging ideas, insights, and feedback to fuel your creative journey and keep abreast of emerging trends and innovations. Embrace a mindset of lifelong learning and experimentation, exploring new techniques, tools, and technologies to continuously evolve and refine your craft in the dynamic world of graphic design.
In essence, the quest for inspiration and resources in the realm of bracket design is a journey of exploration, discovery, and growth, where creativity knows no bounds and innovation knows no limits. By immersing yourself in the wealth of inspiration and resources available, and cultivating a mindset of curiosity, collaboration, and continuous learning, you unlock the full potential of your creative vision, transforming humble brackets into immersive works of art that captivate the senses and inspire wonder. So, embark on this journey with an open mind and a fearless spirit, and let your creativity soar to new heights of excellence and distinction.